Wednesday, 4 June 2014

MYSQL Database Commands syntax

To login (from unix shell) use -h only if needed.

# [mysql dir]/bin/mysql -h hostname -u root -p

Create a database on the sql server.

mysql> create database [databasename];

List all databases on the sql server.

mysql> show databases;

Switch to a database.

mysql> use [db name];

To see all the tables in the db.

mysql> show tables;

To see database's field formats.

mysql> describe [table name];

To delete a db.

mysql> drop database [database name];

To delete a table.

mysql> drop table [table name];

Show all data in a table.

mysql> SELECT * FROM [table name];

Returns the columns and column information pertaining to the designated table.

mysql> show columns from [table name];

Show certain selected rows with the value "whatever".

mysql> SELECT * FROM [table name] WHERE [field name] = "whatever";

Show all records containing the name "Bob" AND the phone number '3444444'.

mysql> SELECT * FROM [table name] WHERE name = "Bob" AND phone_number = '3444444';

Show all records not containing the name "Bob" AND the phone number '3444444' order by the phone_number field.

mysql> SELECT * FROM [table name] WHERE name != "Bob" AND phone_number = '3444444' order by phone_number;

Show all records starting with the letters 'bob' AND the phone number '3444444'.

mysql> SELECT * FROM [table name] WHERE name like "Bob%" AND phone_number = '3444444';

Show all records starting with the letters 'bob' AND the phone number '3444444' limit to records 1 through 5.

mysql> SELECT * FROM [table name] WHERE name like "Bob%" AND phone_number = '3444444' limit 1,5;

Use a regular expression to find records. Use "REGEXP BINARY" to force case-sensitivity. This finds any record beginning with a.

mysql> SELECT * FROM [table name] WHERE rec RLIKE "^a";

Show unique records.

mysql> SELECT DISTINCT [column name] FROM [table name];

Show selected records sorted in an ascending (asc) or descending (desc).

mysql> SELECT [col1],[col2] FROM [table name] ORDER BY [col2] DESC;

Return number of rows.

mysql> SELECT COUNT(*) FROM [table name];

Sum column.

mysql> SELECT SUM(*) FROM [table name];

Join tables on common columns.

mysql> select lookup.illustrationid, lookup.personid,person.birthday from lookup left join person on lookup.personid=person.personid=statement to join birthday in person table with primary illustration id;

Creating a new user. Login as root. Switch to the MySQL db. Make the user. Update privs.

# mysql -u root -p
mysql> use mysql;
mysql> INSERT INTO user (Host,User,Password) VALUES('%','username',PASSWORD('password'));
mysql> flush privileges;

Change a users password from unix shell.

# [mysql dir]/bin/mysqladmin -u username -h hostname.blah.org -p password 'new-password'

Change a users password from MySQL prompt. Login as root. Set the password. Update privs.

# mysql -u root -p
mysql> SET PASSWORD FOR 'user'@'hostname' = PASSWORD('passwordhere');
mysql> flush privileges;

Recover a MySQL root password. Stop the MySQL server process. Start again with no grant tables. Login to MySQL as root. Set new password. Exit MySQL and restart MySQL server.

# /etc/init.d/mysql stop
# mysqld_safe --skip-grant-tables &
# mysql -u root
mysql> use mysql;
mysql> update user set password=PASSWORD("newrootpassword") where User='root';
mysql> flush privileges;
mysql> quit
# /etc/init.d/mysql stop
# /etc/init.d/mysql start

Set a root password if there is on root password.

# mysqladmin -u root password newpassword

Update a root password.

# mysqladmin -u root -p oldpassword newpassword

Allow the user "bob" to connect to the server from localhost using the password "passwd". Login as root. Switch to the MySQL db. Give privs. Update privs.

# mysql -u root -p
mysql> use mysql;
mysql> grant usage on *.* to bob@localhost identified by 'passwd';
mysql> flush privileges;

Give user privilages for a db. Login as root. Switch to the MySQL db. Grant privs. Update privs.

# mysql -u root -p
mysql> use mysql;
mysql> INSERT INTO db (Host,Db,User,Select_priv,Insert_priv,Update_priv,Delete_priv,Create_priv,Drop_priv) VALUES ('%','databasename','username','Y','Y','Y','Y','Y','N');
mysql> flush privileges;

or

mysql> grant all privileges on databasename.* to username@localhost;
mysql> flush privileges;

To update info already in a table.

mysql> UPDATE [table name] SET Select_priv = 'Y',Insert_priv = 'Y',Update_priv = 'Y' where [field name] = 'user';

Delete a row(s) from a table.

mysql> DELETE from [table name] where [field name] = 'whatever';

Update database permissions/privilages.

mysql> flush privileges;

Delete a column.

mysql> alter table [table name] drop column [column name];

Add a new column to db.

mysql> alter table [table name] add column [new column name] varchar (20);

Change column name.

mysql> alter table [table name] change [old column name] [new column name] varchar (50);

Make a unique column so you get no dupes.

mysql> alter table [table name] add unique ([column name]);

Make a column bigger.

mysql> alter table [table name] modify [column name] VARCHAR(3);

Delete unique from table.

mysql> alter table [table name] drop index [colmn name];

Load a CSV file into a table.

mysql> LOAD DATA INFILE '/tmp/filename.csv' replace INTO TABLE [table name] FIELDS TERMINATED BY ',' LINES TERMINATED BY '\n' (field1,field2,field3);

Dump all databases for backup. Backup file is sql commands to recreate all db's.

# [mysql dir]/bin/mysqldump -u root -ppassword --opt >/tmp/alldatabases.sql

Dump one database for backup.

# [mysql dir]/bin/mysqldump -u username -ppassword --databases databasename >/tmp/databasename.sql

Dump a table from a database.

# [mysql dir]/bin/mysqldump -c -u username -ppassword databasename tablename > /tmp/databasename.tablename.sql

Restore database (or database table) from backup.

# [mysql dir]/bin/mysql -u username -ppassword databasename < /tmp/databasename.sql

Create Table Example 1.

mysql> CREATE TABLE [table name] (firstname VARCHAR(20), middleinitial VARCHAR(3), lastname VARCHAR(35),suffix VARCHAR(3),officeid VARCHAR(10),userid VARCHAR(15),username VARCHAR(8),email VARCHAR(35),phone VARCHAR(25), groups VARCHAR(15),datestamp DATE,timestamp time,pgpemail VARCHAR(255));

Create Table Example 2.

mysql> create table [table name] (personid int(50) not null auto_increment primary key,firstname varchar(35),middlename varchar(50),lastnamevarchar(50) default 'bato');

ODI 12c Repository Creation in Mysql database

We can Create ODI 12c Repository RCU in MYSQL database 5.6.12 and above versions.

Before installation we need to add below three parameters in My.ini  parameter file in mysql.


# Uncomment the following if you are using InnoDB tables

innodb_file_format=Barracuda
innodb_large_prefix=ON
log_bin_trust_function_creator=ON

Tuesday, 3 June 2014

ODI 12c StandAlone Installation Step By Step Windows 7

Step1:    Download ODI 12c Software from Oracle Download. ofm_odi_generic_12.1.2.0.0_disk1_1of1.zip 
ODI 12c   

Step2:  Unzip 12.1.2  zip file.

step3:  Open CMD prompt as Administrator

step4:  Install JDK 1.7 in C:\java\  location.

Using below command to launch ODI installation wizard.  java -jar E:\ODI12c\odi_121200.jar

C:\Windows\system32>cd C:\Java\jdk1.7.0_55\bin

C:\Java\jdk1.7.0_55\bin>java -jar E:\ODI12c\odi_121200.jar


Step5: Click on Next

Step6:  Select your installation location.


Step7:  Select  Standalone installation option.

It will install the below plugins  except  ODI Studio & J2ee Agents and ODI Console


Step8:  Validating the system requirements


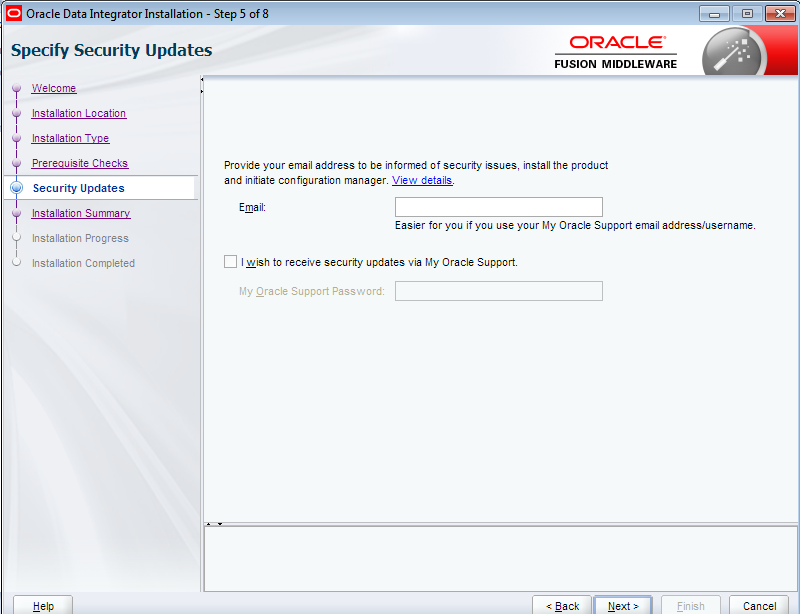
Step9:  Deselect the option for Oracle Support 


Step10:  click on Install option for installation.


Monday, 2 June 2014

Create Standalone Collocated Agent in ODI 12c

1) Create Standalone Collocated Agent in ODI 12c
Create Standalone Collocated Agent in ODI 12c

1) D:\Oracle\Middleware\Oracle_Home\oracle_common\common\bin  Launch  config.batch file for windows or  config.sh file for unix or linux.

2)Select Create New domain and click on next.
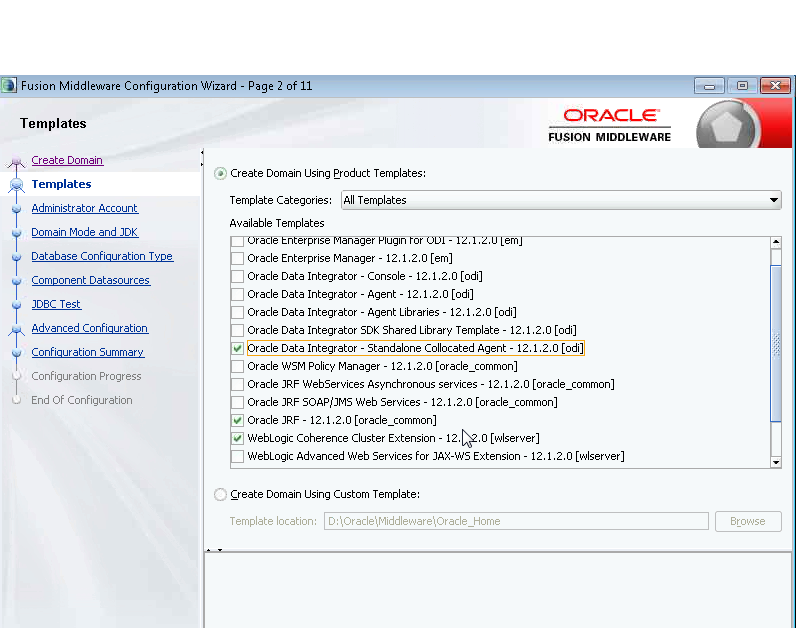
3)Select Oracle Data Integrator -Standaline collocated Agent option in below list.


4) Enter the password for Weblogic login details. (for me password as Admin123)


5)Select RCU data and enter the database details for your RCU.   and Click on Get RCU Configuration option.


6) Select the all options for your repository details.


7)Test the selection connections.


8) Select System Components option.


9)Enter the Standaline agent details  Portno : 20910, Name :  OracleDIAgent1,
User name :  SUPERVISOR , password :  welcome ,Select Master Repository.


10) See the status of domain creation successful.


11) Domain is created in you Oracle Home folder inside user_projects folder.
D:\Oracle\Middleware\Oracle_Home\user_projects\domains\base_domain

12) Start the services using below command in your domain folder.

startWebLogic

Creating Agent in Topology.


14) Goto =>Topology=>Physical Architecture=>Agents=>Right click=>New Agent.


Sunday, 1 June 2014

ODI 12c Repository Creations Step By Process in Oracle XE 11.2 Database

1) Go to Oracle\Middleware\Oracle_Home\oracle_common\bin  Call  rcu.batch for windows and rcu.sh for Unix.


2)Select System Load & Product Load


3) Provide your database details.  With SYSDBA privileged user.


4) Checking the DB requirement.  IF Oracle Database should be Greater than 11.2.0.3.
If you are using Oracle 12C. Check below requirement if you are getting below error in 12c.

Oracle DB 12c:--ORA-65096: invalid common user or role name

follow below rules.

http://www.ludovicocaldara.net/dba/playing-with-oracle-12c-users-and-roles/


5) Select below options for Repository users.

6) Validating the requirements.


7)Common Password for all users.


8) Master Repository and Work Repository Credentials.


9) It will create below list of Users and Table Spaces.

10). click on Create button to create all Repository tables.


11) Done.


Friday, 30 May 2014

Change Oracle DB 11g Character Set to AL32UTF8

Oracle11g: how I change character set to AL32UTF8?


SQL> ALTER DATABASE CHARACTER SET INTERNAL_USE AL32UTF8;
ALTER DATABASE CHARACTER SET INTERNAL_USE AL32UTF8
*
ERROR at line 1:
ORA-12719: operation requires database is in RESTRICTED mode

=>Shutdown your database using below command

SQL> shut immediate
Database closed.
Database dismounted.
ORACLE instance shut down.

=>Startup your database in restrict mode

SQL> startup restrict
ORACLE instance started.

Total System Global Area 1071333376 bytes
Fixed Size                  1375792 bytes
Variable Size             562037200 bytes
Database Buffers          503316480 bytes
Redo Buffers                4603904 bytes
Database mounted.
Database opened.

=>Then Apply alter command for changing character set

SQL> ALTER DATABASE CHARACTER SET INTERNAL_USE AL32UTF8;

Database altered.

=>Verifying after changes New Character Set

SQL> select distinct(nls_charset_name(charsetid)) CHARACTERSET,
  2  decode(type#, 1, decode(charsetform, 1, 'VARCHAR2', 2, 'NVARCHAR2','UNKOWN'
),
  3  9, decode(charsetform, 1, 'VARCHAR', 2, 'NCHAR VARYING', 'UNKOWN'),
  4  96, decode(charsetform, 1, 'CHAR', 2, 'NCHAR', 'UNKOWN'),
  5  112, decode(charsetform, 1, 'CLOB', 2, 'NCLOB', 'UNKOWN')) TYPES_USED_IN
  6  from sys.col$ where charsetform in (1,2) and type# in (1, 9, 96, 112) order
 by CHARACTERSET;

CHARACTERSET                             TYPES_USED_IN
---------------------------------------- -------------
AL16UTF16                                NCHAR
AL16UTF16                                NCLOB
AL16UTF16                                NVARCHAR2
AL32UTF8                                 CHAR
AL32UTF8                                 CLOB
AL32UTF8                                 VARCHAR2

6 rows selected.

SQL> select userenv('language') from dual;

USERENV('LANGUAGE')
----------------------------------------------------
AMERICAN_AMERICA.AL32UTF8


=>Shutdown and Restart Database for use.


After ODI 12c Installation Applying the patches odi_1212_opatch.zip


  • Unzip the file odi_1212_opatch.zip in a root directory (no space in the path)

  • Add opatch in the PATH
  C:\> set PATH=c:\OdiHome\OPatch;%PATH%

  • Verify that you can reach the utilities “opatch” and “unzip” from the directory where the patches are.
  • I have copied odi_1212_opatch zip into C:\temp  directory
C:\temp\odi_1212_opatch>where unzip

C:\temp\odi_1212_opatch>where opatch


Set Oracle_Home ( ODI Installation home
set ORACLE_HOME=D:\Oracle\Middleware\Oracle_Home

Apply all the patches under the subdirectory odi_1212_opatch

c:\temp\odi_1212_opatch>opatch napply odi_1212_opatch


C:\Java\jdk1.7.0_55\bin>set PATH=D:\Oracle\Middleware\Oracle_Home\OPatch;%PATH%

C:\Java\jdk1.7.0_55\bin>cd C:\TEMP\odi_1212_opatch

C:\TEMP\odi_1212_opatch>where opatch
D:\Oracle\Middleware\Oracle_Home\OPatch\opatch
D:\Oracle\Middleware\Oracle_Home\OPatch\opatch.bat

C:\TEMP\odi_1212_opatch>where unzip
E:\app\lucky\product\11.2.0\dbhome_1\BIN\unzip.exe

C:\TEMP\odi_1212_opatch>set ORACLE_HOME=D:\Oracle\Middleware\Oracle_Home

C:\TEMP\odi_1212_opatch>opatch napply odi_1212_opatch
Oracle Interim Patch Installer version 13.1.0.0.0
Copyright (c) 2013, Oracle Corporation.  All rights reserved.


Oracle Home       : D:\Oracle\Middleware\Oracle_Home
Central Inventory : C:\Program Files\Oracle\Inventory
   from           : n/a
OPatch version    : 13.1.0.0.0
OUI version       : 13.1.0.0.0
Log file location : D:\Oracle\Middleware\Oracle_Home\cfgtoollogs\opatch\opatch20
14-05-30_12-58-13PM_1.log


OPatch detects the Middleware Home as "D:\Oracle\Middleware\Oracle_Home"

Verifying environment and performing prerequisite checks...
OPatch continues with these patches:   16926420  17170540  17469061

Do you want to proceed? [y|n]
y
User Responded with: Y
All checks passed.

Please shutdown Oracle instances running out of this ORACLE_HOME on the local sy
stem.
(Oracle Home = 'D:\Oracle\Middleware\Oracle_Home')


Is the local system ready for patching? [y|n]
y
User Responded with: Y
Backing up files...
Applying interim patch '16926420' to OH 'D:\Oracle\Middleware\Oracle_Home'

Patching component oracle.xdk.jrf.xmlparserv2, 12.1.2.0.0...

Patching component oracle.xdk.jrf.jaxp, 12.1.2.0.0...

Verifying the update...
Applying interim patch '17170540' to OH 'D:\Oracle\Middleware\Oracle_Home'

Patching component oracle.as.common.clone, 12.1.2.0.0...

Verifying the update...
Applying interim patch '17469061' to OH 'D:\Oracle\Middleware\Oracle_Home'

Patching component oracle.fmw.upgrade, 12.1.2.0.0...

Verifying the update...

Patches 16926420,17170540,17469061 successfully applied.
Log file location: D:\Oracle\Middleware\Oracle_Home\cfgtoollogs\opatch\opatch201
4-05-30_12-58-13PM_1.log

OPatch succeeded.